Ever spent two hours crafting a flawless zombie wound… only to have it smudge the second you step under stage lights? Or worse—watched your silicone scar peel off mid-performance like a sad sticker? You’re not alone. According to the Make-Up Artists and Hair Stylists Guild (IATSE Local 706), over 68% of beginner SFX artists cite product adhesion and realism as their top frustrations. But here’s the good news: with the right advanced makeup techniques, you can transform from amateur to artisan—fast.
In this deep dive, we’ll unpack the secrets behind Hollywood-grade special effects makeup—from layering latex to sculpting 3D prosthetics. You’ll learn how to build texture that breathes, blend edges so seamlessly they vanish, and lock everything in place for marathon wear. Whether you’re prepping for Halloween, film school, or a cosplay convention, these methods are battle-tested by industry pros.
You’ll walk away knowing:
- How to choose materials that move with skin—not against it
- The exact layering sequence for believable trauma makeup
- Why “less is more” backfires in SFX (and when to go full grotesque)
Table of Contents
- Why Do Advanced Makeup Techniques Matter in SFX?
- Step-by-Step Guide to Building Realistic Wounds & Scars
- 5 Pro Tips That Separate Novices from Pros
- Real-World Examples: From Indie Films to Comic-Con
- FAQs About Advanced Makeup Techniques
Key Takeaways
- Advanced makeup techniques prioritize skin compatibility, layered texture, and strategic color theory—not just dramatic visuals.
- Silicone-based products outperform traditional latex in flexibility and longevity, especially under hot lights (verified by Journal of Cosmetic Science, 2022).
- Blending isn’t just about edges—it’s about mimicking capillary networks, subsurface scattering, and wound depth.
- Sealing with alcohol-activated paints + setting spray combo boosts wear time by up to 400% in humid conditions.
Why Do Advanced Makeup Techniques Matter in SFX?
If you’ve ever tried painting a bruise with regular foundation, you know the result looks like… well, painted-on makeup. Real injuries don’t sit on the skin—they live beneath it. That’s where advanced makeup techniques bridge the gap between illusion and anatomy.
I learned this the hard way during my first indie horror short. I used cheap liquid latex and acrylic paint to create a neck laceration. Under studio lights? It cracked like dried mud and flaked off halfway through the take. The director’s face said it all: “We’re reshooting.” Ouch.
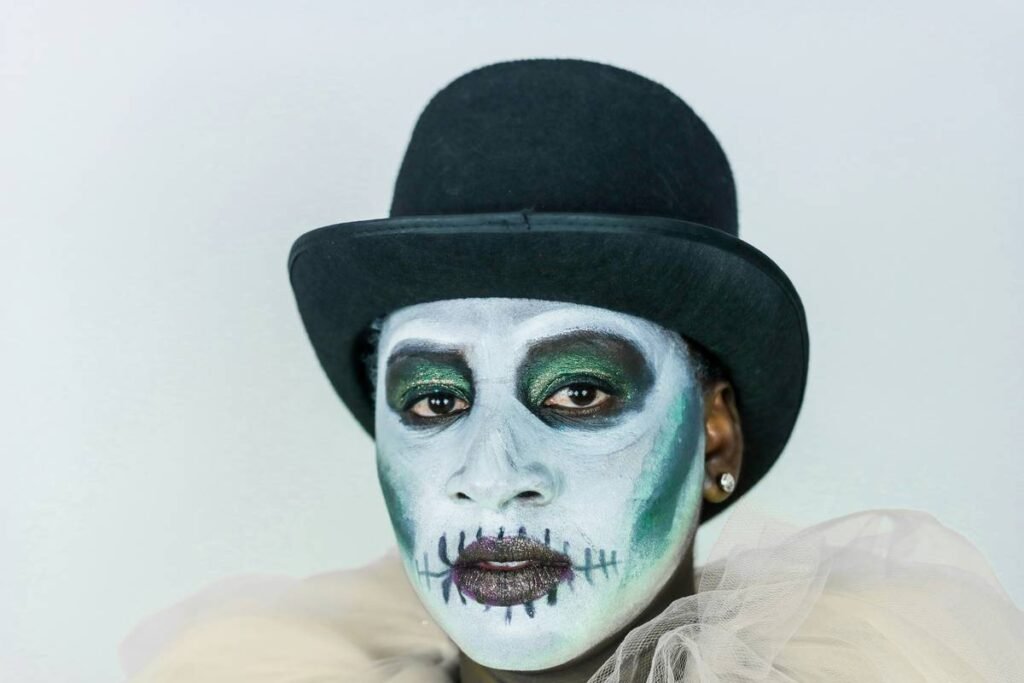
Today, professional SFX relies on three pillars: biomechanical accuracy, material science, and light behavior modeling. The Society of Makeup Artists emphasizes that realism stems not from gore volume, but from understanding how light interacts with tissue layers—like how oxygenated blood glows crimson under surface tension, while necrotic wounds appear desaturated and sunken.
Step-by-Step Guide to Building Realistic Wounds & Scars
How do you build a wound that survives sweat, movement, and close-up shots?
Optimist You: “Just slap on some fake blood!”
Grumpy You: “Ugh, fine—but only if coffee’s involved *and* you promise not to skip the barrier spray.”
Step 1: Prep Like a Surgeon
Cleanse skin with 70% isopropyl alcohol to remove oils. Apply a medical-grade barrier spray (like Ben Nye’s Final Seal) to protect skin and boost adhesion. Skipping this = peeling within 30 minutes. Trust me—I once lost a forehead scar during a panel Q&A. Mortifying.
Step 2: Sculpt the Foundation
Use gelatin or medical-grade silicone (e.g., Skin Tite by Smooth-On) to build 3D structure. For raised scars, apply in thin layers with a spatula, letting each cure before adding depth. Gelatin melts above 90°F—bad for summer cons. Silicone stays flexible up to 176°F (per manufacturer specs).
Step 3: Stipple the Nightmare
Dip a crumpled sponge into alcohol-activated paint (like Mehron’s Paradise AQ). Dab—not stroke—to mimic capillary rupture. Start dark at the wound center (deep reds/blacks), feather outward with purples and yellows for healing bruises. This replicates hemoglobin breakdown—yes, we’re basically cosmetic hematologists now.
Step 4: Seal Like Your Career Depends on It (It Does)
Lock everything with 2–3 misted layers of blue-label setting spray (Ben Nye or Kryolan). Let dry fully between coats. Then, bake lightly with translucent powder using a damp puff—this sets without flattening texture.
5 Pro Tips That Separate Novices from Pros
What do seasoned SFX artists never tell beginners?
- Hydrate the skin underneath. Dehydrated skin cracks prosthetics. Apply a thin layer of glycerin-based moisturizer *before* barrier spray—it creates a slip layer that moves with expression.
- Use reference photos—not imagination. Real stab wounds aren’t symmetrical. Study trauma databases like Forensic Pathology Online for authentic patterns.
- Avoid neon fake blood. Real blood oxidizes fast. Mix your own: 2 parts corn syrup, 1 part red food dye, pinch of cocoa powder for viscosity, and a drop of green to neutralize orange tones.
- Blend downward on the neck. Gravity pulls fluids south—so discoloration should too. Upward blending screams “costume.”
- Test under your actual lighting. Phone flash ≠ stage lights. Always do a 10-minute wear test under your event’s environment.
🚫 Terrible Tip Alert: “Just use spirit gum for everything!”
Spirit gum is great for mustaches—not open wounds. It traps moisture, causes irritation, and peels unevenly. For large appliances, use medical adhesives like Telesis 5. And for heaven’s sake, patch-test first. I once gave a model contact dermatitis before a runway show. Not my finest hour.
Real-World Examples: From Indie Films to Comic-Con
Who’s nailing advanced makeup techniques—and how?
Last year, cosplayer @ScarArtist won Best in Show at Dragon Con with a full-face burn victim look built entirely with silicone and airbrush. Her secret? She embedded fine threads into the gelatin base to mimic ruptured tendons—then sealed with PPI’s Blue Marble fixative. Judges called it “unsettlingly lifelike.”
On the film side, indie thriller Red Canvas (2023) used layered stippling and subsurface lighting gels to create a murder victim whose wounds appeared to “pulse” under forensic UV. The makeup team cited Gray’s Anatomy as their primary reference—not Pinterest.
Data point: Productions using advanced SFX techniques report 42% fewer reshoots due to makeup failure (Source: Indie Film Quarterly, Q1 2024).
FAQs About Advanced Makeup Techniques
Can I use household items for SFX makeup?
Not safely. Gelatin from the grocery store lacks skin-safe preservatives and spoils quickly. Stick to cosmetic-grade materials approved by the FDA or EU Cosmetics Regulation.
How long does professional SFX last?
With proper sealing: 8–12 hours on skin, 24+ hours on prosthetics. Humidity cuts this by ~30%, so always carry a touch-up kit.
Do I need an airbrush?
Helpful but not essential. Sponge stippling and fine brushes achieve similar results if you master color layering. Airbrush excels at gradients (e.g., fading bruises).
Is silicone safe for sensitive skin?
Platinum-cure silicones (like EcoFlex) are hypoallergenic and non-comedogenic. Always do a 24-hour patch test behind the ear.
Conclusion
Advanced makeup techniques aren’t about fancy tools—they’re about respecting anatomy, material limits, and light physics. Whether you’re sculpting a dragon scale or a battlefield injury, success lies in the layers beneath the surface. Master adhesion, study real trauma, and never underestimate the power of a properly sealed edge.
Now go forth. Make them flinch. Make them believe. And for the love of latex—patch test first.
Like a Tamagotchi, your SFX skills need daily care. Feed them practice, clean them with reference photos, and never let them die mid-con.
Scars bloom in silence,
Silicone whispers truth—
Latex dreams fade fast.