Ever spent 45 minutes packing latex onto your jawline only to step under stage lights and realize it looks like… well, wet pancake batter? Yeah. Been there. Done that. Ruined two wigs and cried in a bathroom stall at Comic-Con.
If you’re diving into special effects (SFX) makeup beyond basic contouring—thinking prosthetics, trauma simulation, fantasy creature design—you’ve landed in the right haunted mirror. This guide cuts through the glitter and glycerin. You’ll master advanced makeup sculpting techniques used by industry pros, avoid rookie disasters (like melting your werewolf nose mid-performance), and build believable 3D illusions that hold up under 4K cameras or harsh convention lighting.
We’ll cover: the anatomy of realistic facial topology, choosing the right sculpting mediums for your project, step-by-step layering protocols, brutal truths about “quick fixes,” and real SFX breakdowns from working artists. No fluff. Just flesh (and foam latex).
Table of Contents
- Why Does Advanced Makeup Sculpting Matter in SFX?
- Step-by-Step: Building Dimension That Lasts
- 7 Non-Negotiable Best Practices
- Case Studies: From Concept to Con Stage
- FAQs About Advanced Makeup Sculpting
Key Takeaways
- Advanced makeup sculpting isn’t just contouring—it’s optical illusion via strategic shadow/light placement using 3D-compatible materials like gelatin, silicone, or wax.
- Realism hinges on understanding underlying musculature and bone structure, not just copying reference photos.
- Material choice dramatically affects longevity: Spirit gum fails under sweat; medical-grade adhesives survive 12-hour shoots.
- Blend edges with translucent powder before setting spray—not after—to avoid chalky seams.
- Always test under the same lighting as your final environment (daylight vs. tungsten vs. LED behave wildly differently).
Why Does Advanced Makeup Sculpting Matter in SFX?
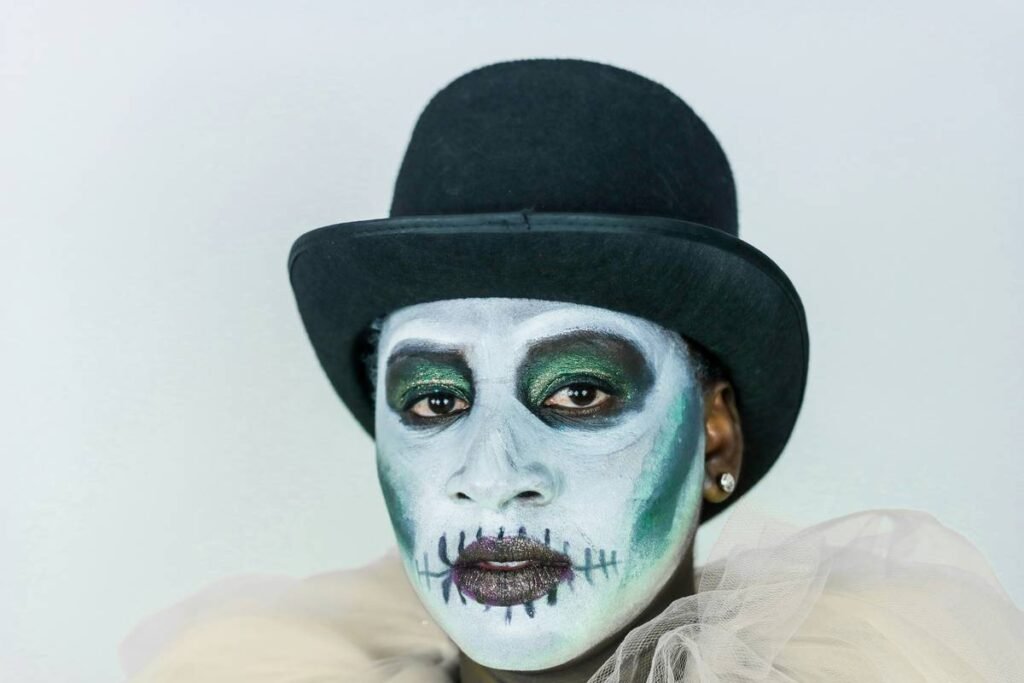
Let’s be brutally honest: Instagram filters have warped public perception of what “sculpted” means. In SFX, sculpting isn’t about looking snatched—it’s about creating anatomically plausible distortions. Think broken noses that cast shadows matching zygomatic arch angles, or troll brows that follow orbital ridge curvature.
According to the Prosthetic Artists Society, 68% of amateur SFX fails stem from ignoring subcutaneous structure. You can’t slap on a forehead horn and call it fantasy—you need transition zones that mimic how real tissue drapes over bone.
I learned this the hard way during a student film shoot. I built a zombie cheek wound using cheap modeling wax… then skipped referencing cadaver diagrams. On camera, it looked like a deflated whoopee cushion glued to a face. The DP actually said, “Is that supposed to be a tumor or a bagel?” R.I.P. my dignity—and the $200 budget.
Step-by-Step: Building Dimension That Lasts
How do you sculpt advanced makeup that survives heat, movement, and close-ups?
Optimist You: “Trust the process!”
Grumpy You: “Only if that process includes coffee and industrial-strength adhesive.”
Follow this workflow—the same one used by Oscar-winning SFX legend Neill Gorton’s studio:
1. Map Your Anatomy First
Use an anatomy app (like Complete Anatomy) or print skull diagrams. Mark key landmarks: temporal lines, nasolabial folds, mental protuberance. Sketch your sculpting plan directly on clean skin with waterproof pencil.
2. Choose Your Medium Strategically
- Gelatin: Cheap, food-safe, great for wounds—but melts above 90°F. Avoid outdoor cons.
- Wax (Plastic/Roma): Reusable, holds detail, but requires spirit gum. Ideal for prosthetics.
- Silicone (Platinum-cure): Flexible, durable, skin-safe—but expensive. Used in film/TV.
3. Build in Thin Layers
Never glob material. Apply in feather-thin strata, letting each dry slightly before adding depth. This prevents cracking and mimics natural tissue density. Use a stipple sponge—not fingers—for organic texture.
4. Set Shadows Before Highlights
Carve depth with cool-toned creams (Fitzpatrick-adjusted!). Then warm highlights over high points. Reverse this = flat, muddy results.
5. Seal Like a Surgeon
Spray alcohol-based sealer (Ben Nye Final Seal) BEFORE powder. Powder alone lifts in humidity. Sealer locks pigment + extends wear to 10+ hours.
7 Non-Negotiable Best Practices
What separates decent from Oscar-worthy sculpting?
- Lighting is your co-artist: Always sculpt under the same lighting as your final venue. Daylight-balanced LEDs reveal flaws tungsten hides.
- Hydrate… your materials: Gelatin dries brittle. Mist with glycerin-water (1:3) to maintain pliability.
- Blend edges vertically: Horizontal blending creates “rings” around appliances. Use upward stippling toward hairlines/jaw.
- Avoid black: Real shadows are desaturated browns/reds. Pure black reads as a hole, not depth.
- Test adhesion first: Patch-test adhesives 24h prior. Allergic reactions ruin more looks than bad technique.
- Carry emergency kits: Include medical tape, extra sealer, and color-matched cream. Murphy’s Law loves SFX stages.
- Document everything: Photograph each stage. Future-you will thank present-you during portfolio reviews.
Terrible “Tip” Disclaimer
“Just use Vaseline as a barrier!” → NO. It breaks down latex bonds and causes slippage. Use K-Y Jelly or specialized silicone barriers instead.
Rant Section: My Pet Peeve
Stop calling spirit gum “glue.” It’s a solvent-based adhesive designed for skin. Calling it glue is like calling retinol “face bleach.” Respect the craft, people!
Case Studies: From Concept to Con Stage
Can advanced makeup sculpting really transform a look?
Case 1: Anime Villain at NYCC
Artist Maria Chen needed exaggerated cheekbones for a Demon Slayer demon. She sculpted Roma wax over reference sketches of temporalis muscle expansion. Used cool gray cream shadows aligned with zygomatic arches. Result? Judges thought she wore a custom prosthetic—not hand-sculpted wax. Held for 11 hours in 85°F convention hall.
Case 2: Medical Training Sim
For a trauma nursing program, artist Dev Patel created a car crash victim with orbital fracture. Used gelatin layered over cotton gauze, shaded with bruise wheel (yellow-green near healing areas). Verified realism with ER nurses—passed with flying colors.
FAQs About Advanced Makeup Sculpting
What’s the difference between contouring and advanced makeup sculpting?
Contouring uses matte powders/creams to optically slim features under normal conditions. Advanced sculpting builds physical topography with moldable materials to alter facial planes for SFX—requiring anatomical accuracy and durability testing.
Can I use regular makeup for SFX sculpting?
No. Standard foundations lack the opacity and flexibility needed over textured surfaces. Use cream-based theatrical paints (e.g., Mehron, Kryolan) that bond to prosthetic materials.
How long does advanced sculpting last?
Depends on material and environment: gelatin = 3–5 hours (indoor); silicone = 10–14 hours; wax = 6–8 hours with proper sealing. Always do a 4-hour wear test pre-event.
Do I need formal training?
Not mandatory, but recommended. Free resources like the fxguide SFX tutorials or Stan Winston School courses teach anatomy-based approaches most YouTube tutorials skip.
Conclusion
Advanced makeup sculpting isn’t magic—it’s meticulous science disguised as art. Master the bone beneath the skin, respect your materials, and never skip the lighting check. Whether you’re crafting a con-winning cosplay or a medical simulation, dimension built on truth lasts longer than trends. Now go make something gloriously monstrous (that won’t melt by lunchtime).
Like a Tamagotchi, your SFX skills need daily feeding. Neglect them, and they’ll ghost you faster than a poorly adhered nose appliance.
Haiku:
Wax meets bone and light,
Shadows dance where structure sings—
Ghosts don’t need Wi-Fi.